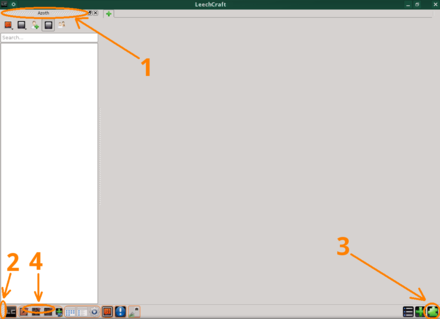
If you managed to get through the issues of constructing your set of modules and decided to bring up the client, you’ll be greeted with the welcome screen, and the application window itself. A notification about hundreds of user packages in Lackman also appears (here and below all beforementioned modules are assumed to be active). We’ll get back to them alter.
You could note the rubber band with the word Azoth on top of the contact list (also called as roster, by default placed on the right part of the window). Dragging this rubber band (1 on pic. 1) widgets can be moved and attached to different parts of the window. I prefer keeping the roster on the left part to keep most of the information in the same part of the screen, as long messages don’t get over the half of the screen. I also keep the sb2 panel at the bottom. Pressing the configuration button on sb2 (2 on pic. 1) will bring up settings mode with the element (3 on pic. 1) for moving panel between different window sides. Other quarks will also get a red minus sign (4 on pic. 1) which can be used to hide the quarks. A hidden quark can be brought back by pressing a green plus sign (5 on pic. 1), appearing near the configuration button.
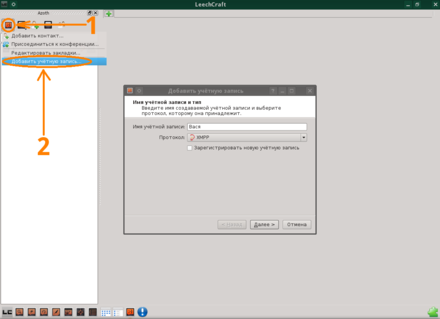
Let’s get to our trip into LeechCraft world and add a few IM accounts to start chatting! Press the first button in the roster (1 on pic. 2), then “Add account…” (2 on pic. 2). It’s worth noting that native IRC implementation is in the beginning of the protocol list, while native XMPP is in the end. It is recommended to use native implementations as they have the widest features set.
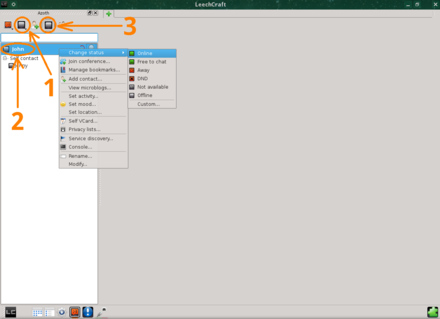
After adding the accounts we can change the global status by the button above the roster (1 on pic. 3) or for each account separately by right-clicking the account in the roster (2 on pic. 3). Then we enter the password. After coming online I immediately turn off displaying offline contacts by pressing the corresponding button on top of the roster (3 on pic. 3).
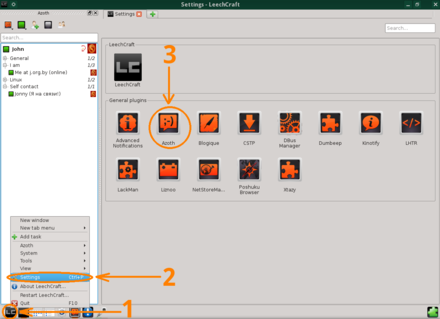
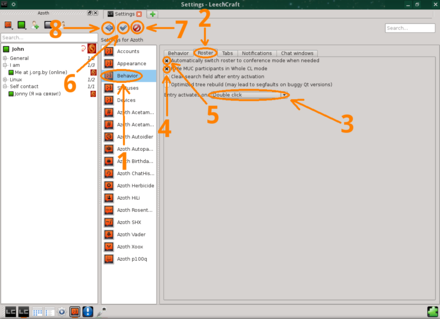
After that we click the LC button (1 on pic. 4) to get to the settings (2 on pic. 4) of the Azoth (3 on pic. 4) module. There are a few settings worth noting on the Behavior page (1 on pic. 5). The Roster tab (2 on pic. 5) has an option to activate contacts by double click (3 on pic. 5). If you feel like using multiuser chats, you may also activate automatic contact list mode switching (4 on pic. 5) and hiding conferences participants in common contact list (5 on pic. 5). Please note the buttons to apply (6 on pic. 5) the settings (don’t forget to press it!) or cancel (7 on pic. 5) changes, or to go back (8 on pic. 5).
If your account has bookmarked multiuser chats with autojoin turned on, you can toggle automatic chat tabs opening (3 on pic. 6) in tabs (2 on pic. 6) behavior (1 on pic. 6) options group. Bookmarked conferences can be joined manually via the account (4 on pic. 6) context menu (5 on pic. 6). After joining conferences are added as roster entries (6 on pic. 6), and their participants all reside in a single contact list group. You can use the line edit above the roster (7 on pic. 6) to search for an entry in the contact list. Roster display mode can be toggled between full view and conference view by the rightest button above the roster (8 on pic. 6), which also has a configurable shortcut.
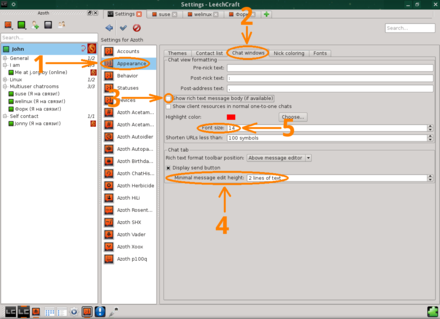
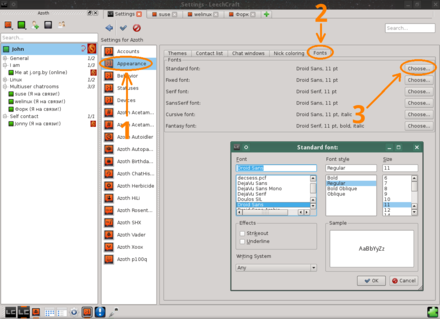
Meanwhile one can go to the Appearance page (1 on pic. 7), then to the Chat windows tab to disable formatted messages (3 on pic. 7) to avoid some Pidgin-related issues, for example. Minimal message edit height (4 on pic. 7) can also be configured there (I prefer two lines). Moreover, here resides the font size option (5 on pic. 7). The fonts themselves can be configured (3 on pic. 8) on the corresponding tab (2 on pic. 8) of the Appearance tab again (1 on pic. 8).
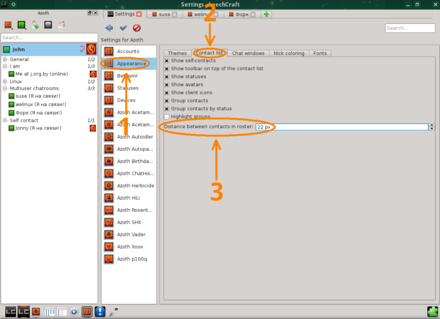
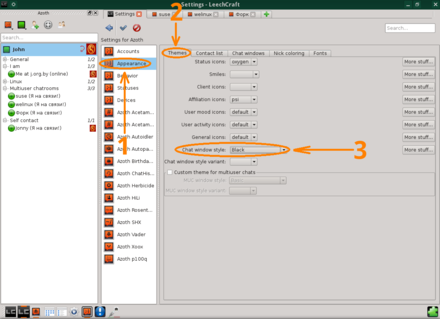
Next, we can configure the height of a single roster entry (3 on pic. 9) in Contact list tab (2 on pic. 9) of Appearance page (1 on pic. 9). On the same page (1 on pic. 10) we can go to Chat windows tab (2 on pic. 10) and configure chat styles (3 on pic. 10). Changing a complex Adium theme can take some time if you have a dozen of opened chat windows, so it’s recommended to close (almost all of) them before changing the styles. The various iconsets can be also changes on the same page.
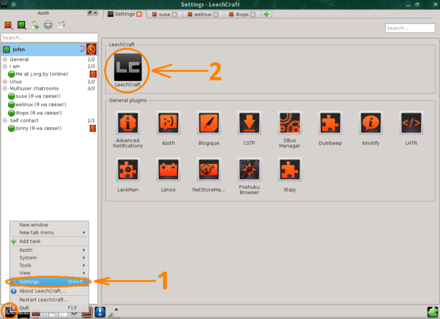
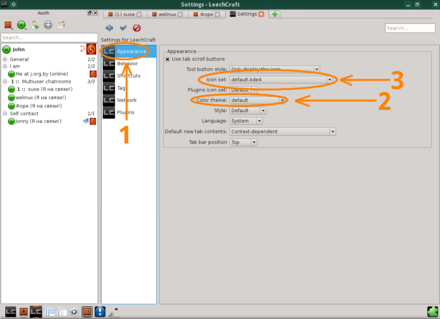
You can change the global LeechCraft color scheme in the settings (1 on pic. 11) of the LeechCraft core (2 on pic. 11), particularly on the Appearance page (1 on pic. 12), choosing the proper color theme (2 on pic. 12). There you can also set the default system iconset or choose another icon theme (3 on pic. 12).
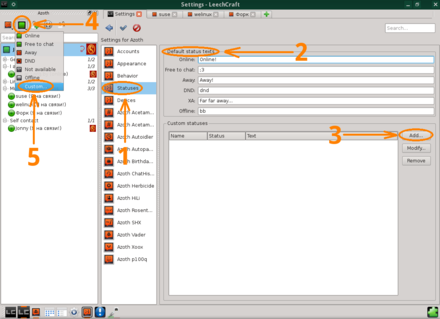
As the final part of our preliminary configuration we can set the default status texts (2 on pic. 13) in status settings (1 on pic. 13). We can also create custom predefined statuses (2 on pic. 13) and entering arbitrary text on the fly via the Custom action (4 on pic. 13) of the status change button above the roster (5 on pic. 13). Similarly, custom statuses can also be defined on the per-account basis via the accounts context menu.
This guide is originally written by DarkneSS in Russian. Translated to English by 0xd34df00d with minor stylistic and contextual changes.

